Creating Custom Notes in a Layout
You can create custom notes in a layout to include various comments or identify certain objects or areas in the space.
-
Open or create a layout. (For more details, see Designing a New Layout .)
-
Click/tap the Notes button
 in the sidebar along the left side of the screen.
Result: The layout switches to Notes view - although there may be no visible change from 2D view. -
Click/tap the Edit
 button at the top left of the screen to put the layout in Edit mode.
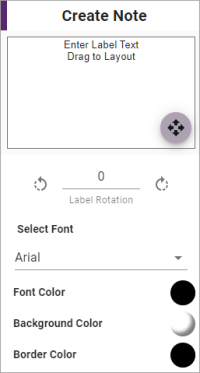
Result: The Create Note panel appears along the right side of the screen. -
Highlight existing text ("Enter Label Text Drag to Layout") in the text box of the Create Note panel and enter new text for your note or label.

-
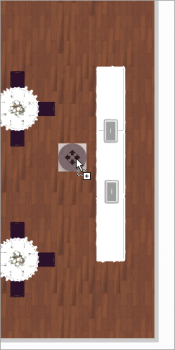
Hold over the circle with directional arrows in the bottom right of the Create Note text box and drag and drop the note into position in the layout.

-
With the note still selected, use the following tools located in the Create Note panel to format it:
-
Label Rotation
Enter a number into this field to rotate the note or label a specific amount, or use the button to rotate 22.5 degrees clockwise or counterclockwise, respectively. -
Select Font
Click/tap the arrow to the right of this field (the default value here is "Arial") to choose a different font for the note. -
Font Color
Click/tap this button and choose a color or enter a custom HEX code to change font color. -
Background Color
Click/tap this button and choose a color or enter a custom HEX code to change color of note background. -
Border Color
Click/tap this button and choose a color or enter a custom HEX code to change color of borders along the edges of the note. -
Font Size
Drag this option left or right to decrease or increase font size, respectively. Note: Overall note size will shrink or grow automatically to support font. -
Line Spacing
If your note has multiple lines of text, drag this option to decrease or increase the spacing between lines. -
Margin
Drag this option to decrease or increase the margin of space between text and border (edges) in the note. -
Border Thickness
Drag this option to decrease or increase the size of all borders along the edges of the note. -
Border Radius
Drag this option to the right to round off corners of the note borders, or to the left to make corners sharper.
-
-
When finished, click the Save button
 at the top left of your screen to save your changes.
Note: Custom notes can be viewed at any time by clicking/tapping the View button at the bottom left of the screen and clicking/tapping the Notes button
  .
.
See Also: